We will be creating an isolated LAN for analyzing malware. I’m using VMware® Workstation 16 Pro which allows me to snapshot virtual machine state and revert as necessary. The basic setup will have a Windows Workstation based on Flare VM [1] and a Linux Workstation based on REMnux [2]. Both these environments are preinstalled with various tools that allows me to get started quickly.
Initial Setup
- Download VMware or Virtual Box (or any other hypervisor that you like). It is preferable to have the “Snapshot” feature, but not mandatory. Most require pro version for this feature and it is well worth it.
- Download and Install Remnux Virtual Appliance in the OVA format [3]
- Install Flare VM on a Windows Image [4]
Configuration
The following configuration will create FlareVM and REMnux virtual machines in an isolated network. The REMnux VM will be configured as the Gateway for FlareVM. This allows us to intercept the traffic between malware (on the FlareVM) and a C2 server for network traffic analysis.
- On the REMnux VM, execute the following command
sudo apt-get update && sudo apt-get -f upgrade && sudo apt-get install exfat-utils - On the Flare VM, execute the following command as Administrator
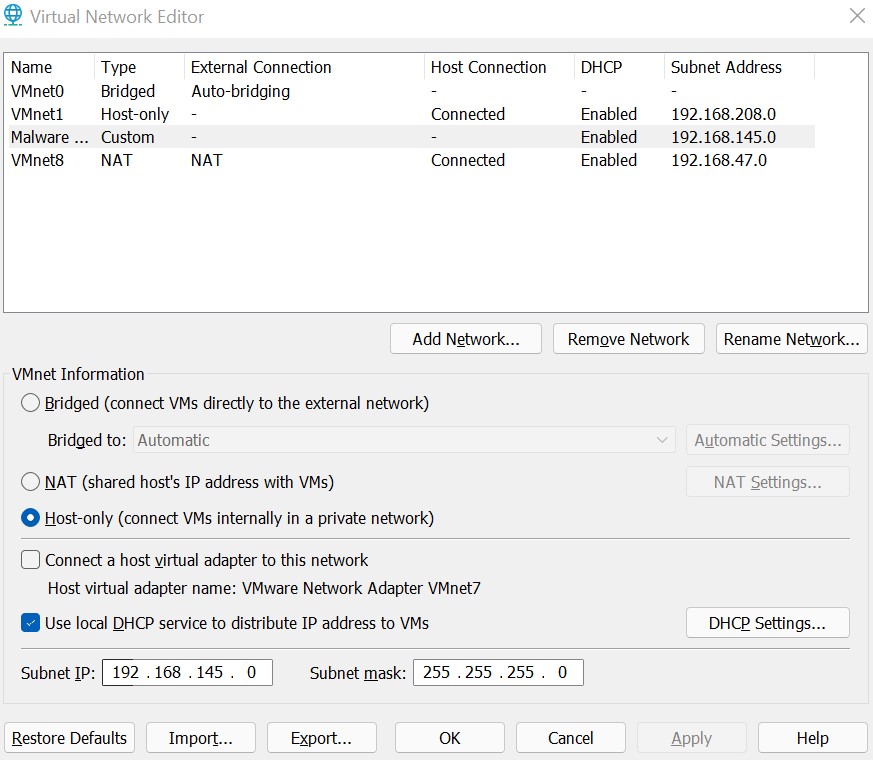
choco upgrade all - In VMWare, go to Edit -> Virtual Network Editor. Edit an existing unused network or add a new network and configure it to be “Host-Only” but uncheck the “Connect a host virtual adapter to this network” option. This will allow us to have a private LAN with just the REMnux and FlareVM hosts. See Figure 1 below for reference.
- Now, change the Network Settings for both the REMnux and FlareVM virtual machines to the newly created/modified isolated network. This can be done by visiting VM -> Settings -> Network Adapter -> Custom: Specific Virtual Network.
- Reboot REMnux and Flare VM.
- After reboot, note down the REMnux ip address. It was
192.168.145.128in my case. - After reboot, note down the FlareVM ip address, subnet mask. IP address was
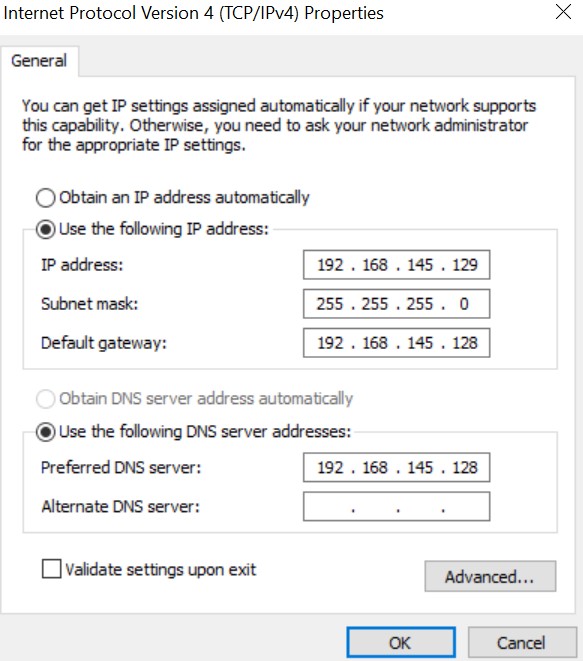
192.168.145.129and subnet mask was255.255.255.0in my case. - On the FlareVM Windows Control Panel, go to “View Network Connections” -> Ethernet0 -> Properties, select Internet Protocol Version 4 (TCP/IPv4) and choose properties.
- Now select the “Use the following IP address:” section and provide FlareVM details you collected in step 7. For Default Gateway, supply the REMnux VM ip address you noted in step 6.
- Now select the “Use the following DNS server addresses:” and supply the REMnux VM ip address for the preferred DNS server. Use Figure 2: Flare VM Network Configuration for reference.
- You can verify the configuration by pinging the REMnux from the FlareVM host
C:\Users\Admin>ping 192.168.145.128. - Finally, take a snapshot of both your Virtual Machines as the golden image. This is the image we will be reverting to each time we need to start from scratch.
Conclusion
Once above setup is complete, you are ready to start analyzing malware. Each time you want to start again, you can just revert to the original snapshot you created for each virtual machine.